Haunted House Lights: Simple Rollover buttons
- This is part 4 of the Haunted house tutorials.
- You will need to have completed part
1,
2 and
3
to do this tutorial.
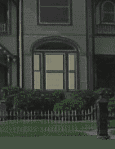
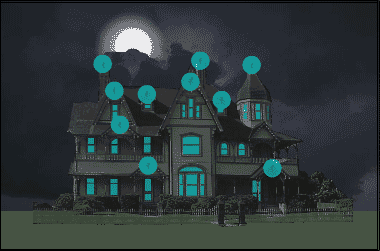
- This is what it will look like when
you complete this section.
1. Open your haunted house fla from the ongoing project.
 2.
Lock all your layers. Click on the top layer. Insert a layer on top. Call
the layer houselights. 2.
Lock all your layers. Click on the top layer. Insert a layer on top. Call
the layer houselights.
3. Zoom on on the main window. Select your rectangle tool. Set the stroke
to no stroke and the fill to light yellow, hex #FFFF99, alpha = 40%.
Draw a rectangle over one of the panes of the downstairs main window. do the
other 5 panes in that window using the rectangle tool.
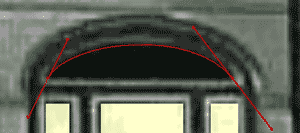 4.
Select the pen tool. Click on the left hand corner of the curved pain above
the main window and drag your point up and to the right. Click on the right
hand corner of the curved pain and drag down and to the right until your
curve matches the top curve. Then alt click that same point. click back at
the starting point to complete the shape. 4.
Select the pen tool. Click on the left hand corner of the curved pain above
the main window and drag your point up and to the right. Click on the right
hand corner of the curved pain and drag down and to the right until your
curve matches the top curve. Then alt click that same point. click back at
the starting point to complete the shape.
Select your arrow tool. click somewhere else to deselect all. Double
click on the outline of the crescent to select just the outline. Hit your
delete key.
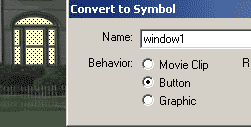 5.
Use your arrow tool to Click drag a marquee around all 7 pains you drew and
select them. Click insert=> convert to symbol. Set the symbol to name =
window1 with the properties of a button. 5.
Use your arrow tool to Click drag a marquee around all 7 pains you drew and
select them. Click insert=> convert to symbol. Set the symbol to name =
window1 with the properties of a button.
Double click the window 1 button. Click once on the up frame to highlight
it. Click drag the frame to the over state.

 6.
Do the same for each of the windows until each window has a rollover light
effect on it. 6.
Do the same for each of the windows until each window has a rollover light
effect on it.
Save your movie. Your ready for part 5.
|


