Flash Haunted House
Part 1, setting up our movie.
1. Open your project file from the download. Click Window=> Library (F11)
to view the contents of your Library.
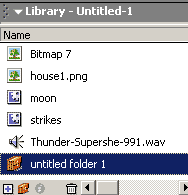 There
you should see the following: There
you should see the following:
- Bitmap 7 is a picture of a lcoudy night sky.
- a House1.png file, which was an imported PNG. The original house image
was brought into photoshop and masked to create a transparent section
around it. It was saved as png to best preserve transparency for flash.
- A Moon, masked to reveal clouds in front of it and a soft glow around
it to give the feeling of haze.
- Strikes is a movie clip made from modifying the
original flash kit file of random scripted strikes.
- 2 Thunder wavs file from flash kit.
- A folder with parts and pieces of each of the clips.
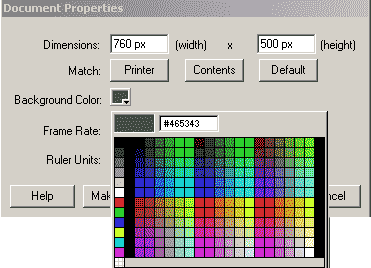 2.
Select your arrow tool and click on the stage. Open your properties
inspector and set the following: 2.
Select your arrow tool and click on the stage. Open your properties
inspector and set the following:
- width = 760
- height = 500
- background color = hex #465343 (mud green)
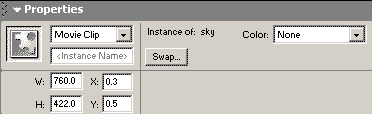 3.
Rename layer1 sky. Drag a copy of the bitmap7 onto the stage. It is much
smaller then the stage. We want it to fit the stage and represent the sky.
Click on the sky image to highlight it. Open your properties inspector and
set this image advanced options to 3.
Rename layer1 sky. Drag a copy of the bitmap7 onto the stage. It is much
smaller then the stage. We want it to fit the stage and represent the sky.
Click on the sky image to highlight it. Open your properties inspector and
set this image advanced options to
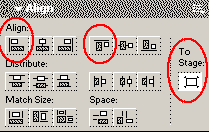 4.
Open your align panel, window=> align, and while the sky image is
highlighted, click the to stage button, and align top and left. Lock the sky
layer. 4.
Open your align panel, window=> align, and while the sky image is
highlighted, click the to stage button, and align top and left. Lock the sky
layer.
5. Add a layer on top of the sky and name it moon. Drag a copy of the moon
symbol onto the stage and place it towards the top near a bright spot in the
sky. Lock that layer.
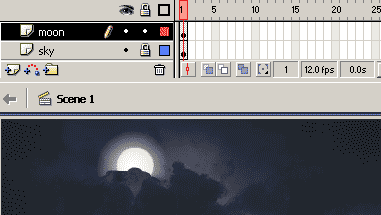
6. Insert a layer above the moon layer and call it strikes. Drag a copy
of the strike movie clip onto the stage so it is in the layer, frame1. The
clip displays an outline on the stage. when this strike instance is
highlighted, use the align panel set to stage, to center align horizontal,
and center align vertical. Lock this layer.
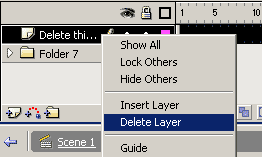 7.
Open the strikes movie clip from the library by double clicking the icon in
front of it. You will see a folder and a layer which is named delete this
layer. Since the bulk of this clip is hidden and scripted, the layer called
delete this layer was placed in there for a guide to allow us to see the
clip on the stage. Right click on this layer and select delete. 7.
Open the strikes movie clip from the library by double clicking the icon in
front of it. You will see a folder and a layer which is named delete this
layer. Since the bulk of this clip is hidden and scripted, the layer called
delete this layer was placed in there for a guide to allow us to see the
clip on the stage. Right click on this layer and select delete.
8. Click on the add new layer button inside this movie click. Call this
layer sound. Click in frame 9 of the sound layer and hit your F7 key to
insert a blank keyframe.

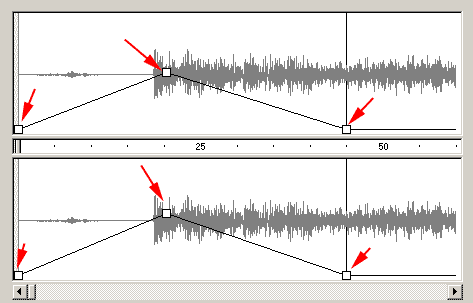
9. Open your properties inspector. Set the sound property to the thunder-supershe wav. and set the sync to stream. Click the edit button.

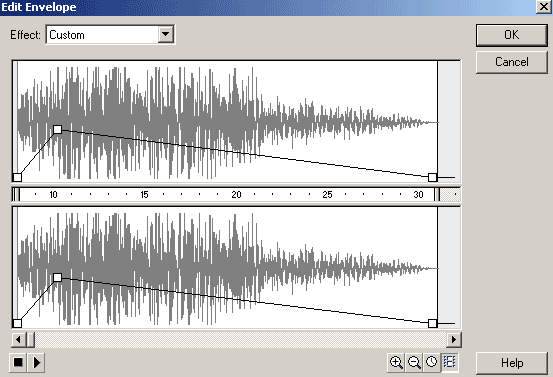
10. In the edit sound box, Click the reduce magnification
 button in
the lower right until you can see the entire wav form. Drag the first square
on the left down to the baseline in both the left and right channel (top and
bottom). Click drag at about frame 10 to position the new square about half
way in volume. Drag the end of the wav volume down to the bottom. End result
is the sound will come in from silent to loud, and then taper to off. The
original was a good sound, but needed to emphasize the strike. Click ok on
your wav edit window. button in
the lower right until you can see the entire wav form. Drag the first square
on the left down to the baseline in both the left and right channel (top and
bottom). Click drag at about frame 10 to position the new square about half
way in volume. Drag the end of the wav volume down to the bottom. End result
is the sound will come in from silent to loud, and then taper to off. The
original was a good sound, but needed to emphasize the strike. Click ok on
your wav edit window.
 11. Click back to scene 1. Open your library. Right click on the strike
movie clip and duplicate the clip to be named strike copy. Open this clip.
Clip on the timeline frame 30 and hit your F5 key 9 times to extend the
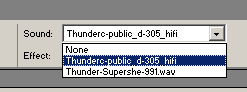
timeline to frame 40. Click on your sound layer. Right click on frame 9 (the second
keyframe in that layer and select clear keyframe. Click on frame 1 of the
sound layer and select the thundero-public sound. Edit that wav and make the
similar changes to this sound as you did the last, cutting the sound to
nothing at frame 1 and the last frame in the clip, frame 45. Set the volume
at the start of the sound, frame 20 to about the midline. Set the sound to
stream. 11. Click back to scene 1. Open your library. Right click on the strike
movie clip and duplicate the clip to be named strike copy. Open this clip.
Clip on the timeline frame 30 and hit your F5 key 9 times to extend the
timeline to frame 40. Click on your sound layer. Right click on frame 9 (the second
keyframe in that layer and select clear keyframe. Click on frame 1 of the
sound layer and select the thundero-public sound. Edit that wav and make the
similar changes to this sound as you did the last, cutting the sound to
nothing at frame 1 and the last frame in the clip, frame 45. Set the volume
at the start of the sound, frame 20 to about the midline. Set the sound to
stream.
Click back on your scene. Drag a copy of stike copy 2 onto the
stage and position it with the other. Lock the strike layer.
12. Insert a new layer above the strike layer.
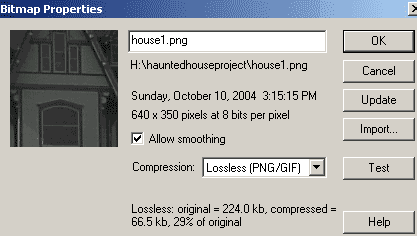
Call this layer house. Open the library. double click on the image icon in
front of the house to open the bmp properties. The image was originally a png, which is a 256 color compression similar to a gif. The default setting
is jpg which is quite lossy in compression, yet has 16 million colors.. Set
the compression to lossless (PNG/GIF). Click test and you will see how
smooth it makes the house look. Click ok when you are satisfied.
13. Drag a copy of the house bmp onto the stage in the new house layer.
Position the house so that the top of the green grass is just at or above
the grass to sky line on the stage.
14. TEST YOUR MOVIE!
Time for part 2!
|


