|
1. Open your CSS editor. It can be simple notepad, Front page,
Dreamweaver, or Top Style Pro. Create a new document and save it as
stylesheet.css in the same directory/folder as your html doc. At this point
you have the following open:
- my.html doc open in a code editor
- stylesheet.css open in your CSS editor
- my.html open in your web browser
2. To format the body color in css, type in body in your css editor and
follow it with brackets which will surround your style. {}
Example
body { }
3. Your styles will be listed down under the body within the brackets,
and indented for convenience so you can easily see what styles go with the
body. Set the background color using the style background-color and set it
to blue.
- Type in your style, in this case background-color, on the
line between the {} brackets.
- All styles are followed by a colon. Type in a colon after
background-color.
- The color can be in hex or one of the 256 names of colors which
html will read. In this case I used blue or #0000FF
- Each style line is followed by a semi colon (;).
body {
background-color: blue;
} |
body {
background-color: #0000FF;
} |
4. Save your style sheet. Refresh your web browser. Your my.html should
display with a blue background. You have not changed the background color
in the html, but in the style sheet. Try changing the background to red or
#FF0000. Save stylesheet.css and refresh your browser. Then try white, #FFFFFF
or black, #000000.
body {
background-color: red;
} |
body {
background-color: #FF0000;
} |
5. Setting the background picture is done similarly.
- Type in the style background-image
- Follow it with a colon
- Type in url and open parenthesis (
- Type in your url using the full or the relative
- Close parenthesis )
- end line with semicolon
body {
background-color: black;
background-image: url(images/title.gif);
}
|
body {
background-color: black;
background-image: url(http://www.dwphotoshop.com/photoshop/imageready/IRSlicing.jpg);
} |
6. Save your style sheet and refresh your browser.
7. Let's say you have a background like the template url we set as the
background and not a background tile. You can set the style for
background-repeat to one of the four options:
| A. Shows only one copy: |
background-repeat: no-repeat; |
| B. Repeats horizontally only: |
background-repeat: repeat-x; |
| C. Repeats vertically only: |
background-repeat: repeat-y; |
| D. Tiles: |
background-repeat: repeat; |
Try each one, save and refresh, to get the feel for it. Leave it
at no repeat.
body {
background-color: black;
background-image: url(http://www.dwphotoshop.com/photoshop/imageready/IRSlicing.jpg);
background-repeat: no-repeat;
} |
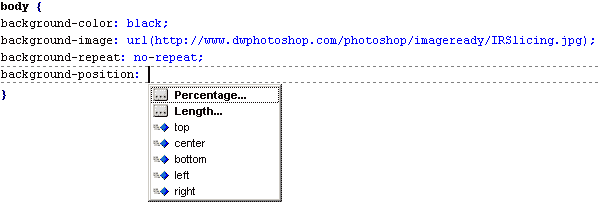
8. Setting the position of the background is also made easy by using the
background-position: style. Background position can be a percentage, a
length in pixels, or a position such as top, center, bottom, left, and
right. The percentage and length as well as center, left and right are
used for indenting. Top and bottom are used for vertical position on the
page.

9. Set the background to fixed or scrolling by using the style:
background-attachment: and set it to scroll; or fixed;.

10: Your final background style for this page after you have tried out the
options, may look like this: body {
background-color: black;
background-image: url(http://www.dwphotoshop.com/photoshop/imageready/IRSlicing.jpg);
background-repeat: no-repeat;
background-position: top;
background-attachment: scroll;
} Or like this: body {
background-color: #000000;
background-image: url(http://www.developingwebs.net/animatedmatrixtexture.gif);
background-repeat: repeat-y;
background-position: left;
background-attachment: scroll;
margin:
} Go to Part 3: Margins!
|


