|
1. Open a new movie. Open the fla you downloaded by clicking File=> open as
library.
2. Place three instances of the button from the setcolor.fla library on the stage. Line them up in a column.
3. Place the little guy symbol on the
stage. Place the hair symbol on top of it and position it.
 4. Click on the hair and name the instance
"hair" on the properties panel. 4. Click on the hair and name the instance
"hair" on the properties panel.
5. Click on button 1. On the Properties panel, Set the color box to tint red
to tint and select red.

6. Click on button 2. On the Properties panel, Set the color box to tint red
to tint and select black.
7. Click on button 3. On the Properties panel, Set the color box to tint red
to tint and select red.
8. Click on button 2. Set the effect for
the second button to tint and select tan..
9. Click on button 1, which is red. Open your action panel. Click the arrow point right at the
upper right hand corner and select normal mode. Write the script by doing the
following:
- Click the plus sign. + => actions=> variables => var

- Type in Haircolor = where haircolor is the name we will give to our
variable

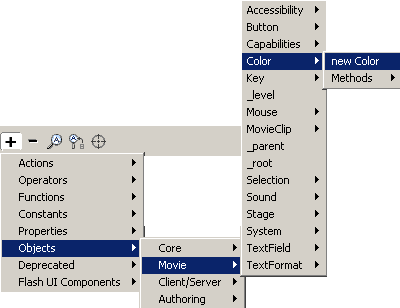
- Click the plus sign. + =>Objects=>Movie=>Color=>newColor
 . .
- Click the Target and select the hair instance.

- Click the plus sign again and follow this path
+ => Objects => Movie => Color => Methods =>SetRGB

- For the object, type in your variable haircolor. Type in the parameters
box the following: 0xff0000 where the ff0000 is the hex code for red.
- The resulting code for the red button should look like this:
on (release) {
var haircolor = new Color(_root.hair);
haircolor.setRGB(0xff00000);
}
10. Click on the second button that is black. follow the directions for 9,
replacing the Hex value in the last step for Black, 000000
11. Click on the third button and follow the directions for 9, replacing the
Hex value in the last step for tan, FFE4B5
15. Publish your movie.
Explanation:
- the _root.hair is the location of your
hair, in the root of the stage and called instance hair.
- haircolor is a variable that then can be
set using the RGB value in hex.
| 


