Making a transparent GIF
By
Ruby
 Sometimes you might need an image with no background. This is called
a Sometimes you might need an image with no background. This is called
a
transparent GIF. In this tutorial you will learn how to make one.
1. Please download
rose.jpg by right
clicking on the link and select save to disk. Open it in Paint
Shop Pro.
2. Select the cropping tool
(red arrow). The red arrow
shows what this looks like and the tool bar it can be found in. This
tool bar can be horizontal as you see here or it may be vertical and on the left side
of the program window if you have never
moved it before
 
3. With the cropping tool selected, position the crosshairs so that you
select an area around the rose that includes all of the rose but with most of the
background not included.
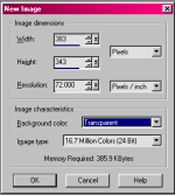 4.
After you have accomplished your crop, you will need to open a new
background image.
Adjust the settings
for the new background
as shown in the diagram. To find the
width and height for your particular image after cropping, go to image and click on
"image information". If you look under dimensions, it will tell you the width and height
in that order. Just place those dimensions
in your screen. 4.
After you have accomplished your crop, you will need to open a new
background image.
Adjust the settings
for the new background
as shown in the diagram. To find the
width and height for your particular image after cropping, go to image and click on
"image information". If you look under dimensions, it will tell you the width and height
in that order. Just place those dimensions
in your screen.
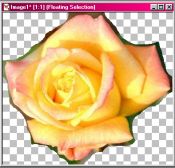
5. Once you have your transparent background open, you should right
click on the cropped image of your rose and then click on "copy". Go over to the
transparent background and right click and go down to and click on "paste as new selection". This will
copy the rose image onto the
transparent background and then you should move it until it
is aligned within the boundaries of the background and click. This will set the rose so it
won't move with your cursor.
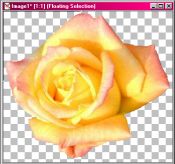
6. The eraser tool (blue
arrow) is located in the same tool bar as the cropping tool. Select the eraser tool and
set it to a larger setting to make a good sized erasure. You can set the size of
the eraser in the "tool options" tool bar.
7. Erase as much of the remaining green background as possible
with this setting without cutting into the rose.
8. Now, the next part is a little tricky and tedious, but if you take
the time and make the effort, you can have some very nice results.
You will want to change the setting on the eraser tool to about 10.
Then zoom in on the rose either by scrolling with the wheel on your mouse or by
clicking on view at the top and going down to and clicking on "zoom in by 1". Then
going around the rose again getting closer and closer.
 9.
Repeat this step zooming in more and setting your eraser tool smaller
each time. The last step should be done at about 4 or 5 zoom and the eraser tool
set at 1. Make sure to delete all of the green background without going into
the rose. 9.
Repeat this step zooming in more and setting your eraser tool smaller
each time. The last step should be done at about 4 or 5 zoom and the eraser tool
set at 1. Make sure to delete all of the green background without going into
the rose.
10. You will now want to save this as a GIF. Once saved, you can put this
image on any background you choose, either light or dark. Imagine this rose
on a black background. WOW! |


