Backgrounds
by Porshiana
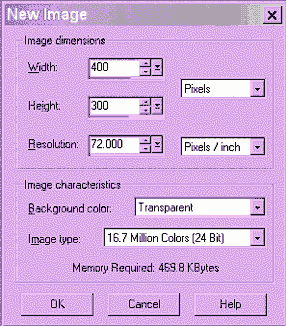 1.
Getting Started Open up paint shop pro. Choose file >new in the upper
left hand corner 1.
Getting Started Open up paint shop pro. Choose file >new in the upper
left hand corner
- when you open a new file, it will ask you for a size.
- about 400 x 300 is good
2. Solid backgrounds Now you see a window that can be compared to
a sheet of paper it should be checkered, the checkering is the background.
Now we are going to choose the color for our paper.
-
  Click
on the paint bucket in the tools on the left of your screen now notice on
the right you have two color boxes under styles. If you hover your mouse
over it the top one says foreground and the bottom says background. Above
this is a rainbow of colors. Click
on the paint bucket in the tools on the left of your screen now notice on
the right you have two color boxes under styles. If you hover your mouse
over it the top one says foreground and the bottom says background. Above
this is a rainbow of colors.
- Make sure we have a color and not a pattern. Hold your mouse over the
black arrow. It should say foreground color, not foreground pattern or
gradient. If it does not say color, click on the arrow, and three choices
come up. Click on the paint brush.

- Click on the color in the top box. A window will open that looks like
this. Here you can click on the colors in both the ring and the square to
get just the color you want or you can slide the bars at the bottom. Now
choose the other color.
- Choose a bright color for the top box and black for the bottom.
- Now that we have both colors, put your mouse on the sheet of paper.
First left click, then right click. You will notice that left clicking
gives you the top color, and right clicking gives you the bottom color.
3. Textures Now let's add some texture to our colors.
- Underneath styles you see textures.
- Click on the black arrows in that top box and click the texture
available.
- To change the texture just click on it once it is in the box.
- Now, fill your paper with the black color by right clicking.
- Then left click, and you will see that your bright color comes up as a
texture instead of a solid and that texture goes over the black.
4. Gradients Now lets use a gradient.
- First begin by choosing texture, and choose the circle with a line
through it. This removes textures.
- Under styles look at the top box with your bright color. Click on the
black arrow and change it to gradient. This is represented by stripes.
- You will see a gradient come up. To change this, just click on it, and
you will see this box.
- Next to a picture of the gradient is an arrow. Choose this arrow
and choose your gradient.
- Click ok.
- Now, left click on the paper, and your gradient comes up.
-
 under
styles, click the gradient again. under
styles, click the gradient again.
- your gradient window comes up again.
- next to repeats, change the number to 5 and choose ok.
- then fill your paper again
- you see that it reapets 5 times
- click on gradient again
- This time, turn repeats back to zero and look under style
- Choose a style, click ok, and try it
- Repeat and try each style.
5. Using Gradients Now that you know how to use gradients, let's
make one.
- Click on the gradient in your style box
- Then choose edit. This window opens
- Choose new.
- Make a name for your gradient and choose ok
-
 This
is what it looks like. This
is what it looks like.
- You have two parts, gradient and transparency. We will work under
gradient first.
- Click on the fr right crayon.
- Then click on the color next to custom.
- Choose a bright red color
- Click on the crayon on the left, and choose a purple color.You will
see a little diamond between them and on top.
- Move this back and forth to see how the color expands. Now this is
nice, but not quite a rainbow.
- Lets add another color. Click on a blank spot right between the
crayons. Presto, a new crayon appears.
- Make this crayon yellow. You may want to add a blue crayon too.
6. Transparency Now lets go to transparency.
- Click on one of the crayons there and change the opacity to about 20.
- Fill your paper White. You will notice the color you made more
transparent is see through.
7. Patterns Now lets move on to patterns.
- Click on the arrow in the styles box and choose pattern. This is
represented by some dots.
- Click on your pattern that shows up in your styles box, and you will
be able to change it
- Test it on your paper
|


