 Graph
Paper Practice with Graph
Paper Practice with
Stroke, Selection, and Swatches
This lesson is meant as an exercise in multiple path selections, created
dashed lines, adjusting stroke weights, and in creating swatches.
 1.
Click File=> New to open a new illustrator document. Set the new document to
the following: 1.
Click File=> New to open a new illustrator document. Set the new document to
the following:
- Name: Graph
- Size: Letter
- Units: pixels
- Orientation: Portrait
- Color Mode: CMYK
2. Make sure your stroke box on your tool bar is forward and black and the
fill box is behind.
 Click
on your grid tool Click
on your grid tool
 (fourth down
on the left side of tool bar with the line segment tool (\). Click and hold
on tiny carrot at bottom right. (fourth down
on the left side of tool bar with the line segment tool (\). Click and hold
on tiny carrot at bottom right.

Click at the upper left of your art board to open the grid options
window.
Set:
- Width at 550
- Height at 550
- Horizontal is 24, skew is 0
- Vertical is 24, skew is 0
Click okay and a grid will show up on your art board. Use your selection
Tool (V)
 to
move your Grid so that it is to
move your Grid so that it is
3. Open your color panel and your stroke panel under the menu windows.
4. Using your direct select tool (A)
 click
on the outside line that frames the grid. With the out line of the grid
still selected move your cursor over the CMYK spectrum at the bottom. Choose
a color of preference or add a green color that has the color values
of click
on the outside line that frames the grid. With the out line of the grid
still selected move your cursor over the CMYK spectrum at the bottom. Choose
a color of preference or add a green color that has the color values
of
-
 c=
90 c=
90
- m= 0
- y= 100
- k= 0
 5.
Open your swatch panel. Back on your color panel choose the color swatch
that you just created. Using your cursor place 5.
Open your swatch panel. Back on your color panel choose the color swatch
that you just created. Using your cursor place
it over the stroke color box and drag down to blank line below the colors in
your swatch panel. The color you choose will appear as a new swatch. The new
swatch color will be saved with the ai file, and will not be in other
document swatch files.
 6.
Open your stoke palette. Set stroke weight to 4. 6.
Open your stoke palette. Set stroke weight to 4.
You will notice that as your selected line changes thickness the new color
green is more evident.
 7.
Click outside of your stage to deselect. Using your direct select tool with
your shift key held down to add to selection select every 5th vertical line
inside the grid frame ( do not count the outside frame). 7.
Click outside of your stage to deselect. Using your direct select tool with
your shift key held down to add to selection select every 5th vertical line
inside the grid frame ( do not count the outside frame).
8. While every 5th stroke within the grid is highlighted, open the Swatch
palette. Select the new swatch that appears on the swatch palette from step
5.
 9. Before deselecting, Set the weight of the stroke to 3 pt. 9. Before deselecting, Set the weight of the stroke to 3 pt. 10. Click
select=> deselect. Using your direct select tool with your shift key held
down to add to selection, select every 5th horizontal line inside the grid
frame (do not count the outside frame).
 Set
the stroke to a weight of 3 on the stroke palette and the color to the new
swatch by clicking the swatch. Set
the stroke to a weight of 3 on the stroke palette and the color to the new
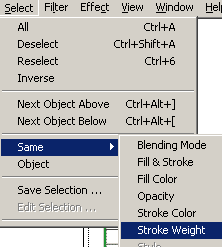
swatch by clicking the swatch. 11. Using your direct select tool select
one of the narrower, black lines either vertical or horizontal. In your menu
above click on select >same>stroke color to select all the black lines, or
select=> same=> stroke weight to select all the 1pt strokes.
 Go to your color
panel and set the stroke to CMYK Go to your color
panel and set the stroke to CMYK
- c = 40
- m = 0
- y = 50
- k = 5
Save this stroke as a swatch on your swatch palette.
 12.
Now you will set the stroke for the highlighted lines to a dashed line.
Open your stroke options in your stroke panel by clicking on the carrot on
the tab or using the flyout to view all options..
Check dashed line and add different numbers in the dash and gap box. Since
we want an regular dashed line, we only need one dash and one gap between
them. Try diffferent settings of dash and gap. Also set the cap to the butt,
rounded or projecting cap to see which one will suit your graph paper.
Deselect to preview at 100 %. Click select=> reselect to reselect and make
changes. 12.
Now you will set the stroke for the highlighted lines to a dashed line.
Open your stroke options in your stroke panel by clicking on the carrot on
the tab or using the flyout to view all options..
Check dashed line and add different numbers in the dash and gap box. Since
we want an regular dashed line, we only need one dash and one gap between
them. Try diffferent settings of dash and gap. Also set the cap to the butt,
rounded or projecting cap to see which one will suit your graph paper.
Deselect to preview at 100 %. Click select=> reselect to reselect and make
changes. Save your AI file!
 |


