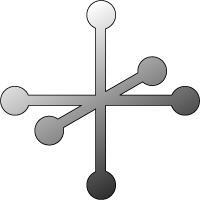
Combining Shapes To Make Compound Shapes
1. Open a new canvas that is 640 by 480 pixels.
 2.
Click the Default colors on your tool box to set the stroke to black and the
fill to white. 2.
Click the Default colors on your tool box to set the stroke to black and the
fill to white.
3. Select your rectangle tool
 by
pressing M. If you do not have your rectangle tool after hitting M hold your
shift key down and hit M to toggle the nested tools having the same shortcut
key, until you see the selected tool is the rectangle tool. by
pressing M. If you do not have your rectangle tool after hitting M hold your
shift key down and hit M to toggle the nested tools having the same shortcut
key, until you see the selected tool is the rectangle tool.
 4.
Click on your artboard and drag to the right and down. Draw a wide flat rectangle on your artboard. 4.
Click on your artboard and drag to the right and down. Draw a wide flat rectangle on your artboard.
5. Select your ellipse tool (M)
 . It is
nested with your rectangle so you can simply click and hold your rectangle
tool down on the toolbox to see it, or shift M until the ellipse becomes
active. Click drag while holding your shift key to create a circle. The
shift key constrains proportions so you get an exact circle, and not an
ellipse. . It is
nested with your rectangle so you can simply click and hold your rectangle
tool down on the toolbox to see it, or shift M until the ellipse becomes
active. Click drag while holding your shift key to create a circle. The
shift key constrains proportions so you get an exact circle, and not an
ellipse.

6. Click View=> Smart guides to turn them on. Select your selection tool
(V)  and click drag to move the circle to the end of your rectangle so that they
overlap so that the center of circle is on the center of the side of the
rectangle. The smart guides will help you align the circle so that the
center of the circle is on the center line and then on the side of the
rectangle. Click View=> Turn smart guides off.
and click drag to move the circle to the end of your rectangle so that they
overlap so that the center of circle is on the center of the side of the
rectangle. The smart guides will help you align the circle so that the
center of the circle is on the center line and then on the side of the
rectangle. Click View=> Turn smart guides off.
 7.
While your circle is still highlighted, double click your scale tool (S). 7.
While your circle is still highlighted, double click your scale tool (S).
 On the scale
options box. Set it to UNIFORM and press COPY. Your picture does not change,
but the next step will help you reveal the copy. On the scale
options box. Set it to UNIFORM and press COPY. Your picture does not change,
but the next step will help you reveal the copy.
8. Use your
Selections tool to move the selected circle towards the other end of the
rectangle.
 Turn
on your smart guides and place the new circle on the other end of the
rectangle so that the center of the circle aligns with the center of the
rectangle and the center of the rectangle side. Remember to turn your smart
guides off. Turn
on your smart guides and place the new circle on the other end of the
rectangle so that the center of the circle aligns with the center of the
rectangle and the center of the rectangle side. Remember to turn your smart
guides off.
 9.
Currently you can select each shape separately and move separately. Use the
selection tool with the shift key to shift chick on each shape so all is
selected. 9.
Currently you can select each shape separately and move separately. Use the
selection tool with the shift key to shift chick on each shape so all is
selected.
 10.
Click window=> Pathfinder. To combine these shapes to make one big compound
shape. Click the Add to Shape area button. You now have one big shape
made up of 3 paths. Control shift A to deselect so you can see that it is
one big shape now. 10.
Click window=> Pathfinder. To combine these shapes to make one big compound
shape. Click the Add to Shape area button. You now have one big shape
made up of 3 paths. Control shift A to deselect so you can see that it is
one big shape now. 11. Use your selection tool to select your artwork.
Hold your alt key down and drag your shape on the stage to a new location.
Alt drag with the selection tool will duplicate your selected artwork.
Release the alt key.
 12.
Mouse over the corner of the new shape until you see the curved arrow. Hold
your shift key down and Click drag on the arrow to rotate the shape. The
shift key wioll contrain your rotation to 45 degree increments. When your
new shape is vertical, release. 12.
Mouse over the corner of the new shape until you see the curved arrow. Hold
your shift key down and Click drag on the arrow to rotate the shape. The
shift key wioll contrain your rotation to 45 degree increments. When your
new shape is vertical, release.
 13.
Turn the smart guides on again by clicking View=> Smart Guides. Drag the
center of the new shape so it is over the center of the original shape. Turn
Off Smart Guides. 13.
Turn the smart guides on again by clicking View=> Smart Guides. Drag the
center of the new shape so it is over the center of the original shape. Turn
Off Smart Guides.
  14.
Alt drag the vertical shape to drag out a copy of it to the right.. While
the 3rd copy is highlighted open your pathfinder panel again. 14.
Alt drag the vertical shape to drag out a copy of it to the right.. While
the 3rd copy is highlighted open your pathfinder panel again.
15. Deselect all by hitting Ctrl Shift A. Select the direct
select tool (A)
 .(white
arrow) .(white
arrow)
 Click
on the inside side of the long rectangles share inside the 3rd shape that
you just made to highlight only the rectangle of the combined shape. Double
click the scale tool
and set it to
the following can click ok. Click
on the inside side of the long rectangles share inside the 3rd shape that
you just made to highlight only the rectangle of the combined shape. Double
click the scale tool
and set it to
the following can click ok.
- Non-Uniform
- Horizontal = 100
- vertical = 70
 16.
Use your direct select tool to click in the middle of the top ball and move
it straight down, until it is over the top end line. use your direct select
tool to click in the center of the bottom circle and click drag to move it
up so it covers the bottom end of the rectangle. Hint: while dragging add
the shift key to insure the circle is inline with the rectangle. Deselect
all by clicking Ctrl shift A. 16.
Use your direct select tool to click in the middle of the top ball and move
it straight down, until it is over the top end line. use your direct select
tool to click in the center of the bottom circle and click drag to move it
up so it covers the bottom end of the rectangle. Hint: while dragging add
the shift key to insure the circle is inline with the rectangle. Deselect
all by clicking Ctrl shift A.
 17.
Switch to your selection tool to select the 3rd shorter shape. Select your
rotate tool (R) 17.
Switch to your selection tool to select the 3rd shorter shape. Select your
rotate tool (R)
 and double
click it. Set the angle to -60 degrees and click ok. and double
click it. Set the angle to -60 degrees and click ok.
 18.
Turn on your smart guides again and move your 3rd shade so that the center
matches up to the center of the other two. Turn off smart guides. 18.
Turn on your smart guides again and move your 3rd shade so that the center
matches up to the center of the other two. Turn off smart guides.
19.
Shift click on each of the shapes using the selection tool. Open your
pathfinder panel and click the add shape area. They are now one shape.
 20.
While your shape is highlighted, select your gradient tool (g) 20.
While your shape is highlighted, select your gradient tool (g)
 . Open
your gradient palette from the open palettes or if you dont see it, click
window=> gradient. Set the type to linear. While your gradietn tool is
highlighted, you can click in the upper left quadrant of the "jack" and
drag down to the lower right quadrant . . Open
your gradient palette from the open palettes or if you dont see it, click
window=> gradient. Set the type to linear. While your gradietn tool is
highlighted, you can click in the upper left quadrant of the "jack" and
drag down to the lower right quadrant .
  |


