  Blending
shapes Blending
shapes
  1.Select
your default colors of your color palette by clicking the default color
button on the tool box. Click on your gradient at the bottom of the
tool box. 1.Select
your default colors of your color palette by clicking the default color
button on the tool box. Click on your gradient at the bottom of the
tool box.
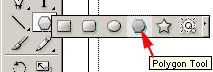 2.
Select the Polygon tool. It is nested with the rectangle tool but has no
shortcut. 2.
Select the Polygon tool. It is nested with the rectangle tool but has no
shortcut.
 3.
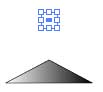
Click on your artboard in the middle. a Polygonal shape dialogue box will
appear. Set the shape to the following and click ok. 3.
Click on your artboard in the middle. a Polygonal shape dialogue box will
appear. Set the shape to the following and click ok.
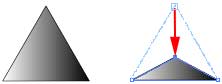 4.
Choose the direct selection tool 4.
Choose the direct selection tool
 (A).
Hold your ctrol , shift key down and hit the letter A to deselect. Click on
the Top anchor point and hold your cursor down. Drag that point down do that
you make a flatter triangle. (A).
Hold your ctrol , shift key down and hit the letter A to deselect. Click on
the Top anchor point and hold your cursor down. Drag that point down do that
you make a flatter triangle.
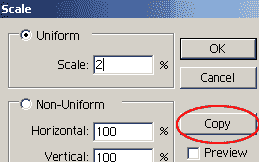 5.
Choose the Selection tool 5.
Choose the Selection tool
 (V)
from the toolbox. Click in the middle of the triangle. Then double click the
scale tool. (V)
from the toolbox. Click in the middle of the triangle. Then double click the
scale tool.  .
Set the scale to the following and click COPY: .
Set the scale to the following and click COPY:
 6.
Choose the Selection tool again (V). Drag the new tiny triangle up. After
you start to drag, hold your shift key as you drag so it constrains to the
same vertical axis. Drag to just more then twice the height of the original
triangle. 6.
Choose the Selection tool again (V). Drag the new tiny triangle up. After
you start to drag, hold your shift key as you drag so it constrains to the
same vertical axis. Drag to just more then twice the height of the original
triangle.
7. While you still have the top tiny tirangle highlighted, reset colors
to default so that the gcolors of the top triangle has white fill.
 8.
Use the Selection tool to click on the new triangle. Hold your shift key and
click on the original triangle so that both are selected. Click Objects=>
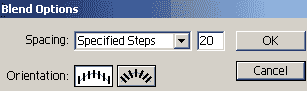
Blend=> Blend options. Set the blend options to the following and click ok. 8.
Use the Selection tool to click on the new triangle. Hold your shift key and
click on the original triangle so that both are selected. Click Objects=>
Blend=> Blend options. Set the blend options to the following and click ok.
- Spacing = Specified Steps
- 20 steps
- Orientation Vertical/ align to page.
 9.
There is no apparent change in the image, however you set up a blending to
automate the production of intermediate steps between the two shapes. Now
click Objects=> Blending=> Make. 9.
There is no apparent change in the image, however you set up a blending to
automate the production of intermediate steps between the two shapes. Now
click Objects=> Blending=> Make.
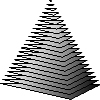
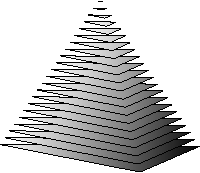 10.
If you repeat the above with triangles that have the flat side above, you
can make this: 10.
If you repeat the above with triangles that have the flat side above, you
can make this:
11. Text

-
 Start
with The word HELLO in caps, times new roman, size 150. Click Type=>Create
outlines. Start
with The word HELLO in caps, times new roman, size 150. Click Type=>Create
outlines.
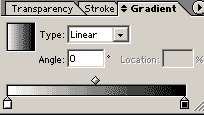
- Click on the gradient tool
 .
On the gradient palette,, select linier, white on left, back on right. .
On the gradient palette,, select linier, white on left, back on right.
 Drag
your cursor from top of text down to the bottom to make your text white on
top turning to black on bottom. turn off the outline on the text by
clicking the square with the red slash through it. Drag
your cursor from top of text down to the bottom to make your text white on
top turning to black on bottom. turn off the outline on the text by
clicking the square with the red slash through it.
-
 Select
your Selection tool. Hold your alt key and click drag the text down and to
left. A new copy of the text will be in front. Select
your Selection tool. Hold your alt key and click drag the text down and to
left. A new copy of the text will be in front.
- Create the blend between the front and back text by shift clicking
both to add to the selection. Then Click object=> blend=> Blending
options. Set your options and then click Options=> Blending=> Make.
|


