To make this, I am assuming
you have some basic knowledge of how to create motion tweens and other basic
Flash necessities.
1. Create a text box, and write something in it. I
chose "abshnasko flash design".
2. Now right click on the text, and click break apart, Right click on the
text and select Distribute to Layers. Now each letter of your text should
have it's own layer.
4. Now highlight ALL of the layers (which should have one
keyframe on each) and Create a Motion Tween for all of them.
5. Now in order to create the fading effect that I used, we
will use the Alpha Color Effects. To do this, we now must convert each
letter in to a Symbol. The easiest way to do this is to click on one of
the letters, and push "F8". Then a dialog box will come
up. For name, just type in the letter, and make sure that
"Graphic" is selected with the radio buttons. Now click
ok. Do this for each letter to prepare for the next step (may take awhile
if you have a lot of text)
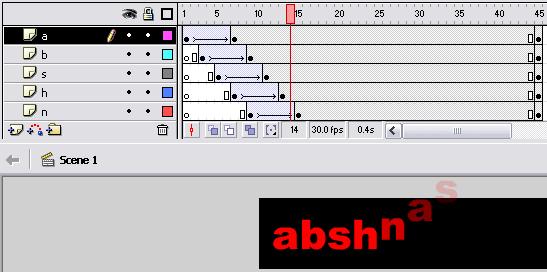
6. Now go to frame 7, and put a keyframe there for each of
the layers by pressing F6. Now your movie timeline should look somewhat similar to the
picture.
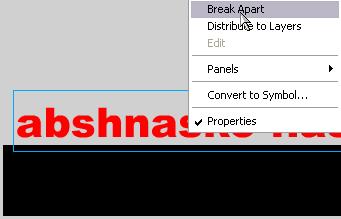
7. Now click on frame 1(does not matter which layer), and
highlight your text. Now select all of the text by making a box with your mouse pointer. Under properties there should be something like the
picture below that says Color: None. Change this to Alpha, and set
the slider to Zero percent (0%)
Note: Make Sure that you have selected the text only on Key Frame 1.
8. Do the same thing for the 7th frame as in the
previous step but make sure the Alpha slider is at 100% this time. Click
on any Keyframe on Frame 7, and select your text. Now in properties, put
the Alpha Color to 100. If you play your movie right now, the text should
quickly fade from nothing to the color of your text, but we are not done.
We have to make each letter come down by itself.
9. Here comes the fun part (not exactly); we have to
make each letter come down sequentially, meaning that the letters wont all fade
in at the same time. Select your text again on the first frame this time,
and use the arrow keys to move it just above the viewing area, or canvas (the
black box in my pictures). Now on the 7th frame, select it and move it
back down to the center of the canvas.
10. Now we have to separate the motion tweens of each letter so that they all don't show up at the same time. The Tween
on the first layer should start on frame one. Now on Layer 2, the tween
needs to start on frame 3. So select the Entire motion tween(the blue
part) and drag it so that the beginning of it is at Frame 3. Each layer
has to start 2 frames after the layer above it. (see picture
below) Also for better performance, make the FPS 24 or 30. I
have it at 30.0, but this setting may not look right on older computers.
11. Now once you've done that for every layer, create a
keyframe on every layer on the last frame of the last motion tween of your last
letter(last, last, last...) My last letter is the "n" in Design,
which ends on frame 45, so I made a keyframe for every layer on that frame so
the letters don't disappear as soon as they fade in.
Editors note: I flipped Horizontal and vertical on my frame 1 by
highlighting all the text on frame 1 after step #7. This is the results:


 1. Create a text box, and write something in it. I
chose "abshnasko flash design".
1. Create a text box, and write something in it. I
chose "abshnasko flash design". 4. Now highlight ALL of the layers (which should have one
keyframe on each) and Create a Motion Tween for all of them.
4. Now highlight ALL of the layers (which should have one
keyframe on each) and Create a Motion Tween for all of them.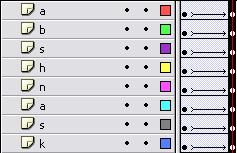 6. Now go to frame 7, and put a keyframe there for each of
the layers by pressing F6. Now your movie timeline should look somewhat similar to the
picture.
6. Now go to frame 7, and put a keyframe there for each of
the layers by pressing F6. Now your movie timeline should look somewhat similar to the
picture.