|
|
||||||||||||||||
|
|
|
||||||||||||||||

|

"Building The Web Into a Nicer Place -- One Site At A Time"
|
|
|
||||||||||||||
| |
|||||||||||||||||

|
|
||||||||||||||||
|
|
|
||||||||||||||||
|
|
||||||||||||||||
|
|
|
||||||||||||||||
|
"Building The Web Into a Nicer Place -- One Site At A Time"
|
|
|
||||||||||||||
| |
|||||||||||||||||
|
|
|
||||||||||||||||
|
|
|
||||||||||||||||


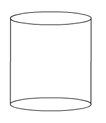
 Draw
an oval with no fill. To do this, select the red slash
Draw
an oval with no fill. To do this, select the red slash
 Use
the Arrow tool
Use
the Arrow tool


 Select
the line tool
Select
the line tool
 Click
the bottom oval's inside half to highlight it and delete it.
Click
the bottom oval's inside half to highlight it and delete it. Select a linear Gradient.
 Click
directly on the right Gradient Color Modifier color box(1). Click on
the color box above(2) and set it to black. This will set your right
color modifier to black if you click on them in this order.
Click
directly on the right Gradient Color Modifier color box(1). Click on
the color box above(2) and set it to black. This will set your right
color modifier to black if you click on them in this order. Fill
the 2 areas of the main object on the stage with this gradient.
Fill
the 2 areas of the main object on the stage with this gradient. Select
the top oval fill using the fill
Select
the top oval fill using the fill