 2.
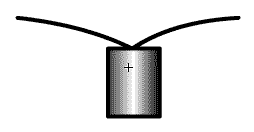
Select your oval tool. Set the outline color to black with a stroke of
hairline, and the fill color to radial gradient with inside color hex
#FFA1A1 and outside color hex number #FF0000. In frame 1 of bulb
1 draw a circle. 2.
Select your oval tool. Set the outline color to black with a stroke of
hairline, and the fill color to radial gradient with inside color hex
#FFA1A1 and outside color hex number #FF0000. In frame 1 of bulb
1 draw a circle.
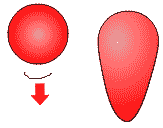
2. Switch to your arrow tool. grab the bottom of the circle line and drag it
down a distance that is the same as the diameter of the circle.
3. Use your fill adjustment tool to elongate and radial gradient and turn
it so that it runs the length of the bulb. Use the fill adjustment tool to
move the center of the gradient to the left.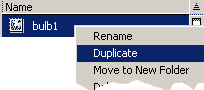
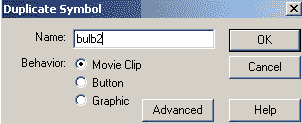
4.Close this symbol and Open your library by clicking Window=> library.
Right click on your bulb 1 symbol and select duplicate. name the file Bulb
2.
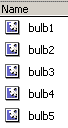
5. Open bulb 2 from the library. Use your arrow tool click on the fill color and use the
dropper on the fill. Change the gradient color to the blue colors listed
below. Duplicte bulb 1 again and call it bulb 3 and change the radial
gradient to the yellow colors.
| color |
inside color |
outside color |
| blue |
#99FFFF |
#0000FF |
| yellow |
#FFFFCC |
#FFFF00 |
| green |
#66FF99 |
#339900 |
| orange |
#FFFFCC |
#FF9900 |
| red |
#FFA1A1 |
#FF0000 |
Continue creating bulbs until you have the five different bulbs with the
colors from the table.

6.Insert a new symbol. Call it socket and give it the properties of a
movie clip. Select your rectangle tool. Set your line color to black,
hairline, and the fill to a linear gradient of black-white-black. Draw a
rectangle.
 7.
Select your line tool. Set your line to a stand solid line with a value of
1. 7.
Select your line tool. Set your line to a stand solid line with a value of
1.

Draw lines from the center top of your rectangle up and to the left and
to the right. Use your arrow tool to bend them slightly in the middle of
each line.
 Constructing
lights Constructing
lights
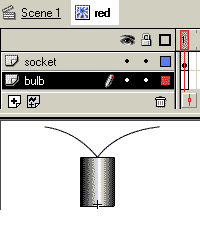
8. Click Insert => New Symbol call it red. Rename layer 1 to bulb.
Right click on the bulb layer and insert new layer. Rename layer 2 Socket.
9. Click on the Socket layer frame 1. Open the library by clicking
Window=> Library. Grab the socket with your left mouse button held down
and drag it out into the symbol. Place it so the reference point cross hair
is at the center bottom of the socket.
10. On the library menu right click on the red symbol and duplicate it.
Call it blue. Duplicate it and call it yellow. Duplicate it and call it green. Duplicate it and call it orange.
11. Reopen the red symbol. Highlight frame 1 of the bulb layer and drag
an instance of bulb1 to the symbol. Use the move tool with scaling options
to resize the bulb to fit in the socket.
12. Open the blue symbol and drag a copy of the bulb2 into the bulb layer
frame 1. use the move tool and scaling to fit it into the socket.
13. Open the yellow symbol and drag a copy of the bulb3 into the bulb
layer frame 1. resize and position the bulb into the socket. Do the same for
the green and orange.
Making a blinking light movie clip 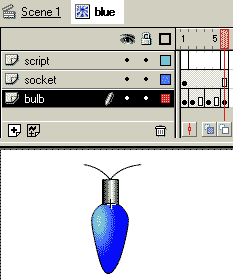 14.
Open the red back up. Right click on the socket layer and add a layer called
Scripts. Add key frames on the following frames in the following layers by
clicking on the frame in the right layer and hitting your F6 key on the
script and bulb layer. Use the F5 key on the socket layer on frame 6. 14.
Open the red back up. Right click on the socket layer and add a layer called
Scripts. Add key frames on the following frames in the following layers by
clicking on the frame in the right layer and hitting your F6 key on the
script and bulb layer. Use the F5 key on the socket layer on frame 6.
| Layer |
Frames |
| script |
2 |
| socket |
6 (use F5 key) |
| bulb |
2.4.6 |
15. Place Motion tweens in frame 2 and 4 of the bulb layer by clicking on the
frame and select tweening = motion on the properties ( or frames panel in
flash 5)
16. Click on frame 4 of the bulb layer. Use your arrow tool to click right on
the bulb. Open your effects panel. Set the brightness up to 50%
Repeat #14-16 for the blue, yellow, green, orange symbols.
Constructing your movie
17. Drag out instances of your light bulbs onto your stage in each of the
colors. Adjust the size so that you can use them as a border for a picture or
a movie. Make Click on frame 2 and hit your F5 key to extend the movie. Insert a layer called ACtions. Put a key frame in frame 1 of hte acitons layer.
Scripting
18. Stop the movie clip- Open up each of the movie clips blue. red. yellow,
green, orange, one at a time and do the following. Click in the first frame
of the movie clip script layer and then open your actions panel. Add a stop
action to that frame.
19. Name your instances- Click on each instance, one at a time and give the
instance a name in the properties panel (flash 5 name it on the instance
panel). Name them in order such as bulb1, bulb2 etc.
20 . Click in the first frame of the script layer. Insert the following
script on the actions panel:
where 10 is the total number of bulbs you have on your iamge. If your
number of bulbs is different, change the count to your exact number of
bulbs.
|


