Drop Down Menu
- You will need
this file
to complete this tutorial.
1. Open your source file. The stage will be empty. The size of the stage
is set at 185 wide by 250 high. The color is white.. Open your
library. There are two folders in there. Open the Primary buttons folder..
2.
Drag a copy of each the primary buttons out onto the stage. Arrange them
bottom to top in the order below. Select the frame and using the Arrow tool
move them up to the upper left corner of the stage.
- Home
- Listings
- Directory
- About
- Contact Us
 3.
Use your arrow tool to select all the buttons on the stage by clicking in
the upper left of the buttons and dragging the arrow tool down to the lower
right of the buttons. When all the buttons are selected, hit your F8 key to
convert selection to symbol. Name the symbol menu and select movie clip for
the property. 3.
Use your arrow tool to select all the buttons on the stage by clicking in
the upper left of the buttons and dragging the arrow tool down to the lower
right of the buttons. When all the buttons are selected, hit your F8 key to
convert selection to symbol. Name the symbol menu and select movie clip for
the property.
4. Double click the Menu symbol to edit the menu symbol timeline. Rename
the layer1 buttons.
5. Insert a layer and call it labels. Insert a layer on top of this layer
and call it Actions.
 6.
On the labels layer, click in frame5 and insert a keyframe by hitting your
F6 key. Click in frame 10 and insert a keyframe by hitting your F6 key.
Click in frame 15 and insert a keyframe by hitting your F6 key. Click in
frame 20 and insert a keyframe again by hitting your F6 key. Click in frame
24 and Hit your F5 key to extend the keyframe on 20 to frame to 24. 6.
On the labels layer, click in frame5 and insert a keyframe by hitting your
F6 key. Click in frame 10 and insert a keyframe by hitting your F6 key.
Click in frame 15 and insert a keyframe by hitting your F6 key. Click in
frame 20 and insert a keyframe again by hitting your F6 key. Click in frame
24 and Hit your F5 key to extend the keyframe on 20 to frame to 24.
 7.
Click in frame 1 of the labels layer. Open the property inspector. Set the
Frame label box to home. 7.
Click in frame 1 of the labels layer. Open the property inspector. Set the
Frame label box to home.
 Click
in frame 5 of the labels layer. Set the frame label on the property
inspector to listings. Set frame 10 to directory, frame 15 to about and
frame 20 to contactus. Click
in frame 5 of the labels layer. Set the frame label on the property
inspector to listings. Set frame 10 to directory, frame 15 to about and
frame 20 to contactus.
 8.
Click in frame 1 of the actions layer. Select the action from the left
column of actions. Actions=> movie control=> stop. right click on frame 1
and select copy frame. Click in frame 5 of the actions layer and right click
to select paste frames. Paste the frame also in frames 10, 15, 20. 8.
Click in frame 1 of the actions layer. Select the action from the left
column of actions. Actions=> movie control=> stop. right click on frame 1
and select copy frame. Click in frame 5 of the actions layer and right click
to select paste frames. Paste the frame also in frames 10, 15, 20.

9. Move your play head back to frame 1 to view your buttons. Select your
arrow tool and click somewhere off your stage. Use your arrow tool to click
on the home button. Open your actions panel. Click actions=> movie control=>goto.
Select the bullet for go to and stop. Set the type to Frame label from the
drop down list; and set the frame to home from the drop down list.

10. Click on each of the buttons, one at a time. Add the same goto
script, however, select the corresponding frame label for that button. Once
you have completed all the button scripts, you are ready to duplicate frames
to propagate to other areas..
 11.
Click in frame 5 and hit F6 to duplicate the previous keyframe. click ion
frames 10, 15, and 20 hitting F6 in each. Click in frame 24 and hit F5 to
extend the keyframe out to 24. 11.
Click in frame 5 and hit F6 to duplicate the previous keyframe. click ion
frames 10, 15, and 20 hitting F6 in each. Click in frame 24 and hit F5 to
extend the keyframe out to 24.
12. Move the Play head back to frame 1. Click on the home button. When
you are on the home pages, your home button should not work. Open the
properties inspector and change the button property to a graphic. Set the
home button to color=tint, bluegreen #00FFCC, 20%

13. Move the Play head to frame 5. Click on the listings button. Open the
properties inspector and change the button property to a graphic. Set the
listings button to color=tint, bluegreen #00FFCC, 20%. Do the same on Frame
10 for the Directory button; frame 15 for the About button; and frame 20 for
the Contact us button. If you hit control test movie now, you should be able
to track your movie clip movements on its timeline by clicking the buttons
and seeing the button color change.
 14.
Click back on frame 5. Click elsewhere on the stage to deselect. Click once on
the Directory button. Hold your shift key down and click on the About and
Contact buttons to add to the selection, so three buttons are selected. Use
your arrow key to move the selection down. Longer movements are done by
holding your shift key down. Fine tune your positioning by releasing the
shift key. 14.
Click back on frame 5. Click elsewhere on the stage to deselect. Click once on
the Directory button. Hold your shift key down and click on the About and
Contact buttons to add to the selection, so three buttons are selected. Use
your arrow key to move the selection down. Longer movements are done by
holding your shift key down. Fine tune your positioning by releasing the
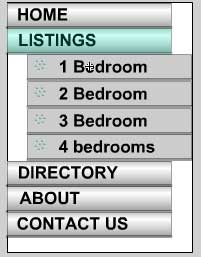
shift key. 15. Drag out the buttonlisting1br, buttonlisting2br,
buttonlisting3br, and buttonlisting4br located in the library folder
called secondary buttons. Arrange them on the right side of the stage bottom
of the first to the top of the second. Move the Directory, about and contact
buttons up together, to touch the submenus
 16.
Click on Frame 10 for directory. Highlight the about button using your arrow
tool. Shift click on the contact button. Use your arrow keys to drag these
buttons down on the canvas. 16.
Click on Frame 10 for directory. Highlight the about button using your arrow
tool. Shift click on the contact button. Use your arrow keys to drag these
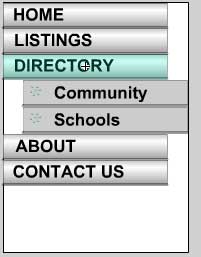
buttons down on the canvas. 17. Drag the two buttons that are
buttondircommunity and buttondirschools onto the stage. arrange these
buttons bottom to top just below the directory button. Move the about and
contact buttons up together to touch the submenu buttons.
18. Test your movie and make sure your submenus are now showing when they
need to be.
 19.
There is extra space below and to the right on the buttons. Select frame 5
since it is the tallest menu. now click anywhere on the stage to deselect
the symbols on the stage. Open the properties inspector. We need to adjust
the height of the movie. Click the size button. Test several values in the
height field. I found on mine that a value of 234 px for height covered all
buttons, with little excess in height. 19.
There is extra space below and to the right on the buttons. Select frame 5
since it is the tallest menu. now click anywhere on the stage to deselect
the symbols on the stage. Open the properties inspector. We need to adjust
the height of the movie. Click the size button. Test several values in the
height field. I found on mine that a value of 234 px for height covered all
buttons, with little excess in height. 20. Notice that the submenus
are not only indented, but are hanging off to the right. To clip off these
buttons we will simply edit the width of the stage to the width of the
silver buttons. In the size box, test a few widths. While 160 will work, 164
seems to cover all buttons on mine, lopping off the sub-menu buttons. Save
your menu project file. Publish your movie. |


