Coin Project 2: Adding Another Variable to Your Timeline.
by Leanne Richer
You will need the results of coins 1 project
to do this tutorial;.
OBJECTIVE: In Flash MX we will script a movie clip on the X and Y axis and use a
condition to keep the movie clip on the stage.
1. Now we are going to introduce a new variable to the main timeline.
Lock the Coins layers. Unlock the Text layer and put your cursor in frame 1.
Since this keyframe extends to frame 3 we are actually adding to
frames 1 to 3 all at the same time.
Select the Text Tool (T) in the Toolbox and open the Properties panel. Set the
font to Static Text, Verdana, size 18, black (#000000), bold, left-aligned. Type
"Ruby:" without the quotes somewhere towards the top right of the stage. Leave
room for a dynamic text box to the right of it which we will create next.
2. With the text tool still active create a new text box by clicking on the
stage again. In the properties panel set it as Dynamic Text, Courier New, size
18, black (#000000), bold, left-aligned. Set the Var as "ruby" without the
quotes.
3. Now we need to resize the dynamic text box so the variable will fit in the
text box as it increments. Click in the text box again so it changes from a blue
to black outline. Mouse over the lower right corner of the text box until your
cursor changes to arrows and drag it considerably to the right.
4. Click Edit => Deselect All. Lock the Text layer. Save your work: File =>
Save.
5.
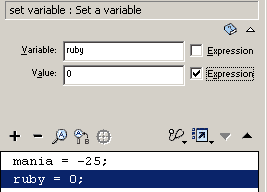
Unlock the Actions layer and put your cursor in frame 1.Open your Actions
Panel and make sure you are in Normal Mode. Click on the current script to
activate the one line of script for mania in the actions panel. Go Actions
=> Variables => and double-click "set variable" to bring it into the right
side of the panel. Type in the Variable field "ruby" without the quotes and
leave Expression unchecked. Type in the Value field "0" without the quotes
and check the Expression box. The result is this: ruby = 0; in the Actions
panel.
Save your work: File => Save.
6. Click in frame 2 of the Actions layer. Open your Actions panel. It
should read "Actions - Frame" on the top of the panel so we know we are
about to script the right thing. Click Actions => Variables => double-click
"set variable" to bring it to the right side of the Actions panel.
Type
in the Variable field "ruby" without the quotes and leave Expression unchecked.
Type in the Value field "ruby+4" without the quotes and check the Expression
box. The result is ruby = ruby+4; in the Actions panel.
By increasing and decreasing the number in the Value field we can speed up or
slow down the motion of the movie clip.
Save your work: File => Save As then File => Publish.
7. We already scripted "gotoAndPlay(2);" in frame 3 of the Actions layers
so we are done scripting that frame.
8.
Now that we have scripted the ruby variable let's click Control => Test Movie to
see the results. We can see that the movie clip moves on the x and y axis and
once it reaches the edge of the stage it keeps moving on those coordinates until
we don't see it anymore. Let's add to our existing scripts so that the movie
clip is confined to the stage...
Next tutorial you will script another variable on
the timeline with another dynamic text box to monitor the variables progress
over time.


 5.
Unlock the Actions layer and put your cursor in frame 1.Open your Actions
Panel and make sure you are in Normal Mode. Click on the current script to
activate the one line of script for mania in the actions panel. Go Actions
=> Variables => and double-click "set variable" to bring it into the right
side of the panel. Type in the Variable field "ruby" without the quotes and
leave Expression unchecked. Type in the Value field "0" without the quotes
and check the Expression box. The result is this: ruby = 0; in the Actions
panel.
5.
Unlock the Actions layer and put your cursor in frame 1.Open your Actions
Panel and make sure you are in Normal Mode. Click on the current script to
activate the one line of script for mania in the actions panel. Go Actions
=> Variables => and double-click "set variable" to bring it into the right
side of the panel. Type in the Variable field "ruby" without the quotes and
leave Expression unchecked. Type in the Value field "0" without the quotes
and check the Expression box. The result is this: ruby = 0; in the Actions
panel. 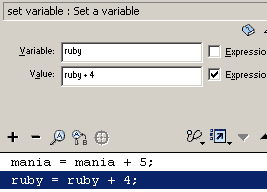 Type
in the Variable field "ruby" without the quotes and leave Expression unchecked.
Type in the Value field "ruby+4" without the quotes and check the Expression
box. The result is ruby = ruby+4; in the Actions panel.
Type
in the Variable field "ruby" without the quotes and leave Expression unchecked.
Type in the Value field "ruby+4" without the quotes and check the Expression
box. The result is ruby = ruby+4; in the Actions panel.