Coin Project 6: Adding a Post Click Animation to Your Coin
This is a continuation of the
coin
project tutorials. You should have completed coin project 5 to do this
tutorial.
1.
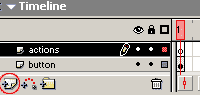
Open your coin movie. On the main timeline, double click on the coin movie
clip to vie the coin movie clip timeline. Rename the layer 1 button. Insert
a layer and call it actions
2. Click in frame one of the actions layer. Open the actions panel. Click
Actions=> Movie Control=> Stop to add a stop(); to the timeline.
3. Click in frame 2 of the button layer
of the coin movie clip. Hit F6 to insert a duplicate keyframe. Highlight
your coin on the stage. Click on the button on the stage in frame 2. Click
modify=> break apart. Click modify=> break apart again, until all of the
button in frame 2 is broken apart.
4.
Use the lasso tool to select the top half of the coin. Use the move tool to
drag it up slightly so that a space exists between the top and bottom. Use
the lasso tool to select the right half of the coin. Use the move tool to
drag it to the right. Use the Lasso tool to select the top right half.
Use the move tool to drag it up and to the right. Use the lasso tool to
select the bottom right half. Use the move tool to move it down and to the
right. You should now have a coin that looks like the image on the right.
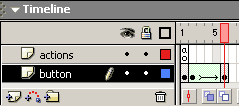
5. Click in frame 6 of the button layer and hit F6 to duplicate the
previous keyframe. Double click on one slice to select it all and drag it
further away from the center of the coin. Repeat this with the other 7
slices. Use the move tool to marquee the entire split coin with all
its slices. set the fill color to red, alpha 0% and the stroke to black,
alpha 0%. Deselect all.
6.
Click in frame 2. Open the properties inspector and select tween = shape.
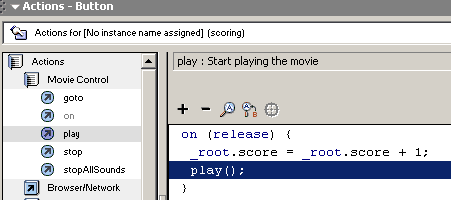
7. Click on frame 1 and select your button. Open your actions panel.
Click on the current script line inside the event handler; _root.score
= _root.score + 1;. Click the menu from the action panel and elect actions=>
movie control=> play.
8. Test your movie. When you click the but it not only scores, but it
disintergrates!


 1.
Open your coin movie. On the main timeline, double click on the coin movie
clip to vie the coin movie clip timeline. Rename the layer 1 button. Insert
a layer and call it actions
1.
Open your coin movie. On the main timeline, double click on the coin movie
clip to vie the coin movie clip timeline. Rename the layer 1 button. Insert
a layer and call it actions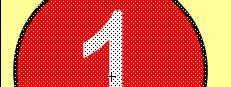 3. Click in frame 2 of the button layer
of the coin movie clip. Hit F6 to insert a duplicate keyframe. Highlight
your coin on the stage. Click on the button on the stage in frame 2. Click
modify=> break apart. Click modify=> break apart again, until all of the
button in frame 2 is broken apart.
3. Click in frame 2 of the button layer
of the coin movie clip. Hit F6 to insert a duplicate keyframe. Highlight
your coin on the stage. Click on the button on the stage in frame 2. Click
modify=> break apart. Click modify=> break apart again, until all of the
button in frame 2 is broken apart.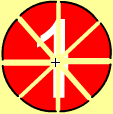 4.
Use the lasso tool to select the top half of the coin. Use the move tool to
drag it up slightly so that a space exists between the top and bottom. Use
the lasso tool to select the right half of the coin. Use the move tool to
drag it to the right. Use the Lasso tool to select the top right half.
Use the move tool to drag it up and to the right. Use the lasso tool to
select the bottom right half. Use the move tool to move it down and to the
right. You should now have a coin that looks like the image on the right.
4.
Use the lasso tool to select the top half of the coin. Use the move tool to
drag it up slightly so that a space exists between the top and bottom. Use
the lasso tool to select the right half of the coin. Use the move tool to
drag it to the right. Use the Lasso tool to select the top right half.
Use the move tool to drag it up and to the right. Use the lasso tool to
select the bottom right half. Use the move tool to move it down and to the
right. You should now have a coin that looks like the image on the right.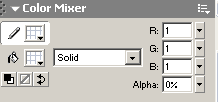
 6.
Click in frame 2. Open the properties inspector and select tween = shape.
6.
Click in frame 2. Open the properties inspector and select tween = shape.