OBJECTIVE: In Flash MX we will script a movie clip on the X and Y axis and use a
condition to keep the movie clip on the stage.
1. Open your Flash Coin Movie from the last tutorial. Click back in frame 2 of the Actions layer.
Highlight the line of script that contains the mania variable in the Actions
panel.
2.
Click Actions => Conditions/Loops => double-click on "if" to add it to the right
side of the Actions panel.
In the Condition field type "mania >= 575" without the quotes. (575
represents the width of the stqage +half the width of the coin)
The lines of script will appear like this in the Actions panel:
if (mania >= 575) {
}
Basically the script reads "If the variable mania is greater than or equal to
575 pixels". Having said that something needs to happen if this condition were
true. In this case we want the mania variable to reset itself on the x
axis.
Highlight the line "if (mania >= 575) {" in the Actions panel so our new line of
script will be inserted directly after this line.
Click Actions => Variables => double-click "set variable" to bring it to the
right side of the Actions panel.
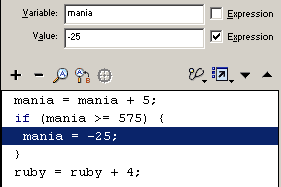
In the Variable field type "mania" without the quotes and leave the Expression
box unchecked.
In the Value field type "5" without the quotes and check the Expression box.
The script will appear like this in the Actions panel:
if (mania >= 575) {
mania = -25;
}
3.
Let's click Control => Test Movie to see the results. Save your work: File =>
Save
Now that we have completed the scripting for the mania variable let's
finish scripting the ruby variable. We are going to use a slightly longer
method this time so we can get better acquainted with the Actions panel.
4. Click in frame 2 of the Actions layer. In the Actions panel, highlight the line of script that contains the ruby variable in the Actions
panel.
Click Actions => Conditions/Loops => double-click on "if" to add it to the right
side of the Actions panel.
In the Condition field type "ruby" without the quotes.
The lines of script will appear like this in the Actions panel:
if (ruby) {
}
Put your cursor in the Condition field after ruby and add a space.
On the left side of the Actions panel click Actions => Operators => Comparison
Operators and then double-click on ">=".
Put a space after >= in the Condition field and then type 420. (420
represents the height of the stage + half the coin width)We put the spaces in to make the script easier to read. It would have worked the
same if we had entered ruby>=420 in the Condition field.
These lines of script will appear like this in the Actions panel:
if (ruby >= 420) {
}
Highlight the line "if (ruby >= 420) {" and click Actions => Variables =>
double-click on set variable to bring it into the right side of the panel.
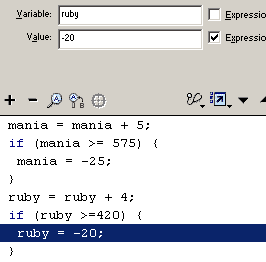
In the Variable field type "ruby" without the quotes and leave the Expression
box unchecked.
In the Value field type "-20" without the quotes and check the Expression box.
This will look like:
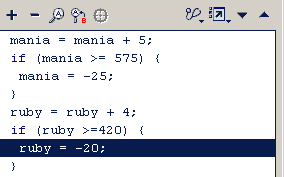
if (ruby >= 420) {
ruby = -20;
}
5.
Click Control => Test Movie to see the results. Save your work: File => Save
The order of the lines in a script is very important and may mean the
difference from everything working smoothly to getting syntax errors. In
keeping with this principle we are going to organize the scrips on frame 2
of the actions panel so we make our variable change value first, then test
the new value of the variables.
If any of the lines are out of order it's easy enough to fix. Highlight the line
you'd like to move in the Actions panel, in this case. I want to move ruby= ruby
+ 4 up right under mania = mania + 5 so I highlight ruby = ruby + 4. Just above our script in the lower
right corner you will notice 2 buttons. The one with a arrow pointing up is the
"Move the selected action(s) up" button and the one with the arrow pointing down
is the "Move the selected action(s) down" button. Use these 2 buttons to change
the order of the lines until the line order match the script shown above.
Save your work: File => Save You can watch your variables in your text boxes
display the value as it increases and resets as it gets to the high point we set
of 575 for mania and 425 for ruby.
Before you close your movie I would suggest you experiment a little.
Change the values for the variables in frame 2 of the Actions layer to
change the speed of the movie clip. Use these scripts in your own movie
clips.
Congratulations on a job well done! Next
tutorial is setting some button actions to control position of the coin.


 In the Variable field type "mania" without the quotes and leave the Expression
box unchecked.
In the Variable field type "mania" without the quotes and leave the Expression
box unchecked.
 Highlight the line "if (ruby >= 420) {" and click Actions => Variables =>
double-click on set variable to bring it into the right side of the panel.
In the Variable field type "ruby" without the quotes and leave the Expression
box unchecked.
In the Value field type "-20" without the quotes and check the Expression box.
Highlight the line "if (ruby >= 420) {" and click Actions => Variables =>
double-click on set variable to bring it into the right side of the panel.
In the Variable field type "ruby" without the quotes and leave the Expression
box unchecked.
In the Value field type "-20" without the quotes and check the Expression box.
 If any of the lines are out of order it's easy enough to fix. Highlight the line
you'd like to move in the Actions panel, in this case. I want to move ruby= ruby
+ 4 up right under mania = mania + 5 so I highlight ruby = ruby + 4. Just above our script in the lower
right corner you will notice 2 buttons. The one with a arrow pointing up is the
"Move the selected action(s) up" button and the one with the arrow pointing down
is the "Move the selected action(s) down" button. Use these 2 buttons to change
the order of the lines until the line order match the script shown above.
If any of the lines are out of order it's easy enough to fix. Highlight the line
you'd like to move in the Actions panel, in this case. I want to move ruby= ruby
+ 4 up right under mania = mania + 5 so I highlight ruby = ruby + 4. Just above our script in the lower
right corner you will notice 2 buttons. The one with a arrow pointing up is the
"Move the selected action(s) up" button and the one with the arrow pointing down
is the "Move the selected action(s) down" button. Use these 2 buttons to change
the order of the lines until the line order match the script shown above.